The first time the GIS tool is used you will need to configure the database and GIS connection details. Configuration settings are user specific so every user will have to set the database and GIS connection details before they can use the tool.
The connection details, together will all the other user options configurable through the tool’s ‘Options’ user interface, are stored in a user.config file within the user’s windows profile.
In Windows 10 the user.config file can be found in:
In principle the HLU Tool will support connections with multiple relational database systems including SQL Server, Oracle, PostgreSQL and Microsoft Access, although the connections with PostgreSQL and Oracle have not been tested.
It is recommended that the database system used is SQL Server because it provides performance, reliability and volume benefits over Microsoft Access. Because PostgreSQL and Oracle use a client/server, as does SQL Server, they will provide similar benefits over Microsoft Access but this has not been tested with the HLU Tool.
To configure the database connection:
Double-click on the link in the start menu or the desktop icon (HLU GIS Tool - Launch) to launch the application.
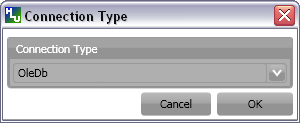
Once the tool is running a ‘Connection Type’ dialog will be displayed as shown in the figure Connection Type dialog.
To connect the HLU Tool to a Microsoft Access database containing the HLU data:
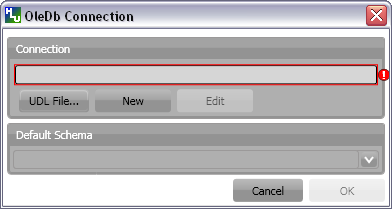
Launch the HLU Tool and select OleDb from the drop-down list, then click OK. A dialog will be displayed as shown in the figure OleDb Connection dialog.
If you have an existing Microsoft Data Link (UDL) file, click UDL File… and browse to the appropriate directory.
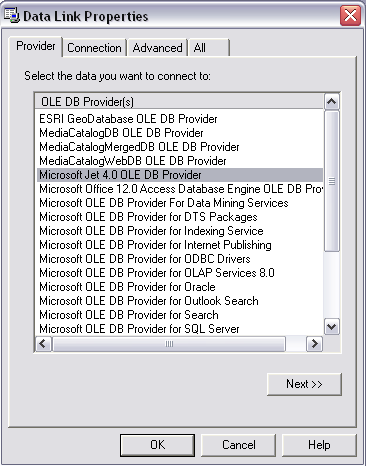
Otherwise, click New to define a new connection. The Provider tab of the ‘Data link properties’ dialog will be displayed as shown in the figure Data Link Properties Provider dialog.
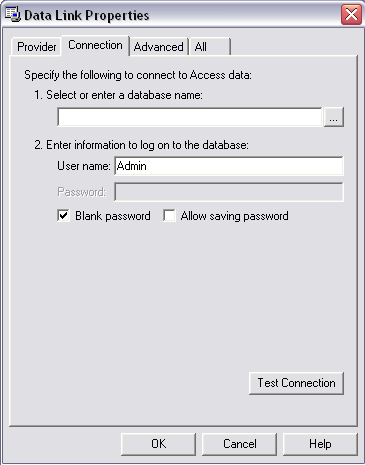
Click to browse to an existing database. If user names and passwords are defined for the database, untick Blank password and enter your user name and password.
Click OK, then click OK on the ‘OleDb Connection’ dialog.
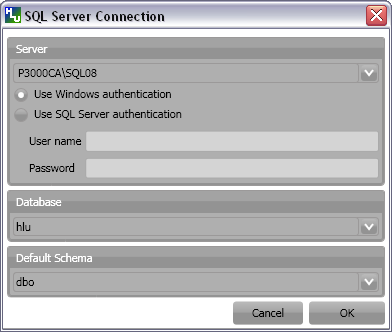
If the computer or server is listed but no services are listed e.g. P3000CA, you can either:
Select the computer or server, then press End or use the Arrow keys to move the cursor to the end, then type the name of the database service.
Exit the HLU Tool, then open the SQL Server Configuration Manager. Right-click on SQL Server Browser and set the start mode as Automatic or Manual. Start the service, then re launch the HLU Tool and select the database service from the list.
Select whether you wish to use Windows or SQL Server authentication. This will depend upon how your SQL Server database has been configured.
If you are using SQL Server authentication, enter the user name and password you use to connect to SQL Server.
Select the HLU database from the ‘Database’ drop-down list.
The Default schema defaults to ‘dbo’. If you wish to use a different schema, select it from the drop-down list, then click OK.
To re-configure only the database connection the database configuration information must be reset by starting the tool with a /d switch parameter. To reset the configuration:
In Windows, go to Start Menu > Run….
If you have installed the HLU Tool in the default location, at the prompt type:
"C:\ProgramFiles\HLU\HLUGISTool\HluGisTool.exe"/d
Note
If you have installed the tool in another location, enter the appropriate folder path in double quotes followed by /d.
This will start the tool and prompt the user to enter new database connection details.
Tip
As part of the installation of the tool a shortcut to ‘Reconfigure’ the tool will automatically be added to the Start menu (along with a shortcut to ‘Launch’ the tool). This shortcut uses a /c switch (instead of the /d switch above) which will reset both the database and the GIS configuration information.
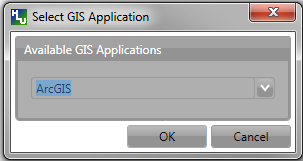
When the tool is first launched it will check your system to determine which GIS applications are installed. If both ArcGIS and MapInfo are installed on your system a dialog will be displayed for you to select which one to use as shown in the figure Select GIS Application dialog.
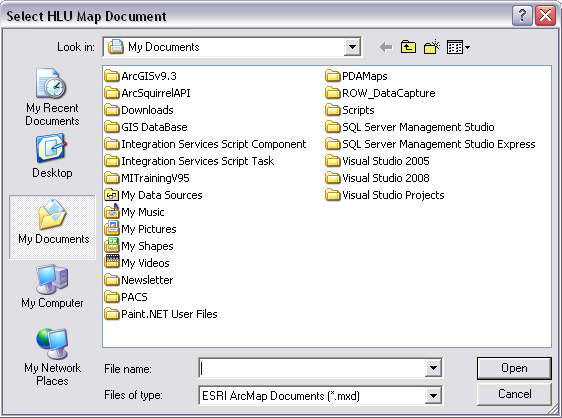
A dialog will be displayed which allows you to open an existing ArcGIS map document or MapInfo workspace which contains the HLU layer as shown in the figure Map Document selection dialog (ArcGIS).
For ArcGIS users this dialog may not be visible - hold Alt and press Tab on your keyboard to switch windows.
If you have an existing map document or workspace which contains the HLU layer, browse to the file and click Open. The HLU Tool will then be ready for use.
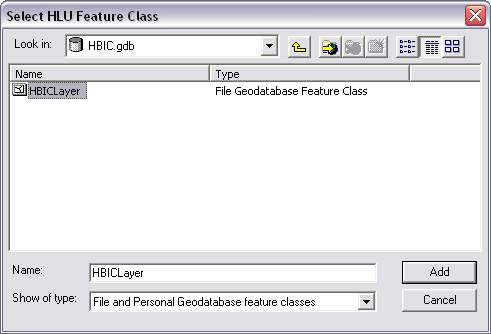
If you do not have an existing map document or workspace, click Cancel. A dialog will then be displayed as shown in the figure HLU layer selection dialog (ArcGIS) which allows you to select the HLU layer.
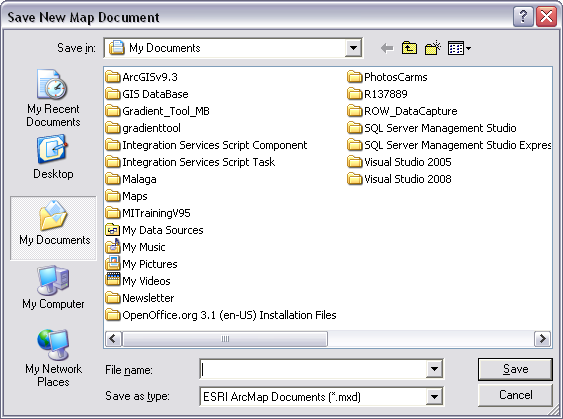
Browse to the HLU layer file and click Open. You will then be prompted to select a location to save as a new map document or workspace as shown in the figure Save New Map Document dialog (ArcGIS).
To re-configure only the GIS connection, the GIS configuration information must be reset by starting the tool with a /g switch parameter. To reset the configuration:
In Windows, go to Start Menu > Run….
If you have installed the HLU Tool in the default location, at the prompt type:
"C:\ProgramFiles\HLU\HLUGISTool\HluGisTool.exe"/g
Note
If you have installed the tool in another location, enter the appropriate folder path in double quotes followed by /g.
This will start the tool and prompt the user to enter new GIS connection details.
Tip
As part of the installation of the tool a shortcut to ‘Reconfigure’ the tool will automatically be added to the Start menu (along with a shortcut to ‘Launch’ the tool). This shortcut uses a /c switch (instead of the /g switch above) which will reset both the database and the GIS configuration information.
Tables in the database that are prefixed by ‘lut_’ are lookup tables and some of these can be tailored to the requirements of each organisation. Examples of configuration include:
Adding new users to enable edit capability.
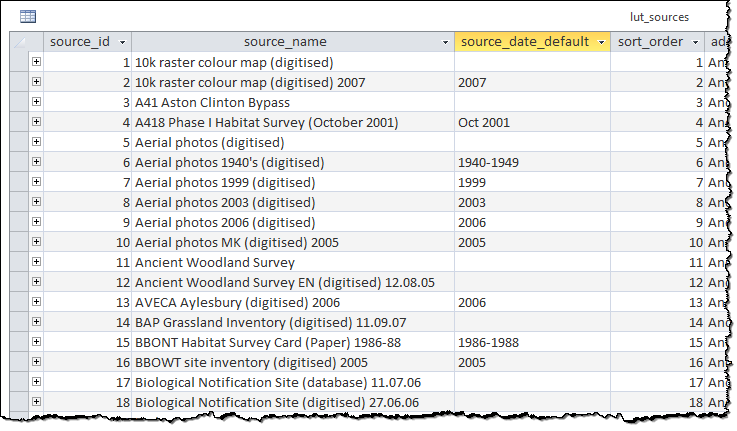
Adding new sources as reference datasets.
Adding new legacy habitats.
Hiding ‘non-local’ habitats, habitat classes and habitat types.
Changing the order that the values appear in drop-down lists.
Note
Changes to the lookup tables won’t take effect for HLU Tool instances that are running. The HLU Tool will need to be closed and re-started before any lookup table changes take effect.
See also
See Lookup Tables for more information on lookup tables.
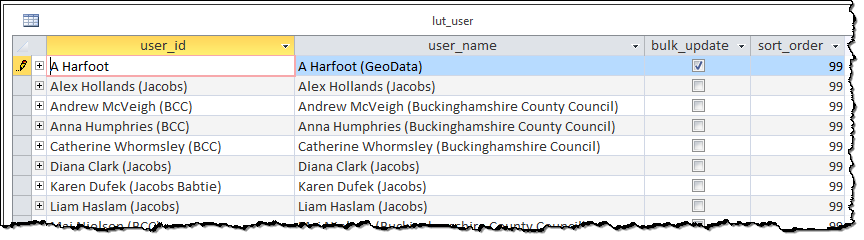
New users of the HLU Tool must be added to the ‘lut_user’ table if they wish to apply any updates. The format of the table is shown in the figure Format of the lut_user table.
Users will be able to use the tool even if their user details have not been entered into the lut_user table. However, ‘[Read Only]’ will appear in the user interface title bar and they will not be able to apply any changes.
Users must also have edit access to the database and GIS feature layers in order to apply changes using the tool.
Existing user records cannot be removed from the ‘lut_user’ table if they are referenced by any of the data records (i.e. if they have applied any changes to the data). This is because data integrity must be retained.
Caution
Bulk update permission should only be assigned to expert users and should only be used with caution as mistakes can have major affects on the data.
Existing source records cannot be removed from the ‘lut_sources’ table if they are referenced by any of the data records (i.e. if they have been used in any incid data records). This is because data integrity must be retained.
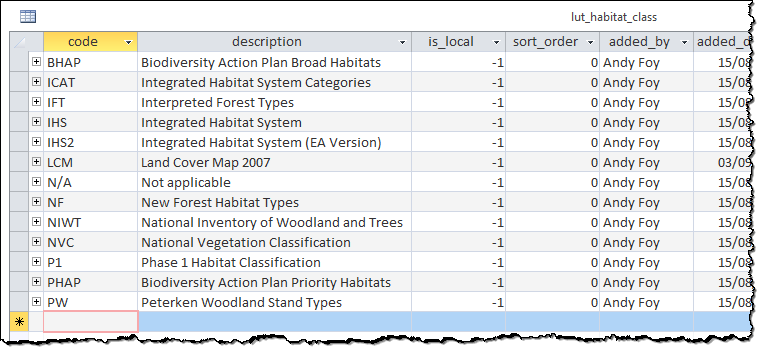
Habitat Classes can be flagged as local or not in the ‘lut_habitat_class` table. The format of the table is shown in the figure Format of the lut_habitat_class table.
Setting the local flag of a Habitat Class to ‘False’ (zero) in the ‘lut_habitat_class’ table will stop it appearing in the ‘Habitat Class’ drop-down list in the Habitats tab of the main window and in the ‘Habitat Class’ drop-down list in the Sources tab. This enables entire habitat classes that are not used by the organisation to be hidden to keep the drop-down list as short as possible.
Note
Only Habitat Classes that are indirectly referenced by records in the ‘lut_habitat_type_ihs_habitat’ translation table (by referencing one or more code_habitat_type values that relate to a habitat_class_code in the ‘lut_habitat_types’ table and subsequently a Habitat Class code in the ‘lut_habitat_class’ table) will appear in the ‘Habitat Class’ drop-down list in the Habitats tab of the main window, even if the is_local flag in the ‘lut_habitat_type’ table is set to ‘True’ (minus one). This is because the ‘lut_habitat_type_ihs_habitat’ table controls the cross-reference between different Habitat Classes/Types and IHS Habitats.
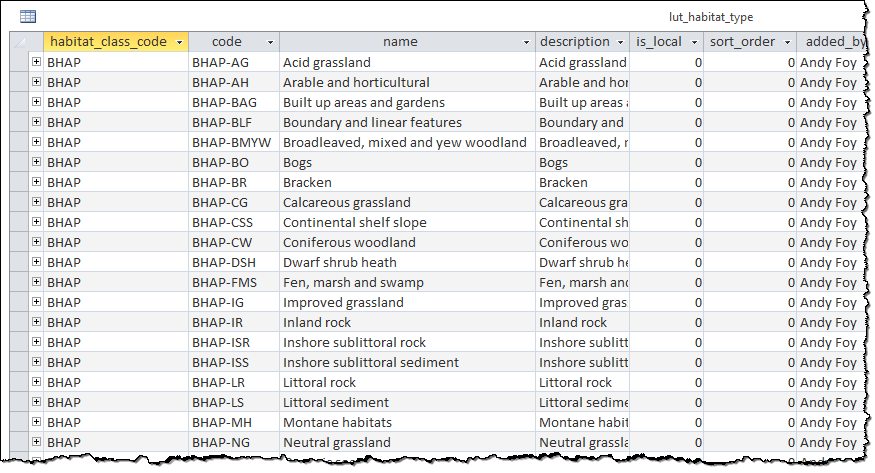
Habitat Types can be flagged as local in the ‘lut_habitat_type` table. The format of the table is shown in the figure Format of the lut_habitat_type table.
Setting the local flag of a Habitat Type to ‘False’ (zero) in the ‘lut_habitat_type’ table will stop it appearing in the ‘Habitat Type’ drop-down list in the Habitats tab of the main window and in the ‘Habitat Type’ drop-down list in the Sources tab. This enables specific habitat types that are not used by the organisation, or are not found in the local area, to be hidden to keep the drop-down list as short as possible.
Note
Only Habitat Types that are directly referenced by records in the ‘lut_habitat_type_ihs_habitat’ translation table (by referencing one or more code_habitat_type values that relate to a Habitat Type code in the ‘lut_habitat_type’ table) will appear in the ‘Habitat Type’ drop-down list in the Habitats tab of the main window, even if the is_local flag in the ‘lut_habitat_type’ table is set to ‘True’ (minus one). This is because the ‘lut_habitat_type_ihs_habitat’ table controls the cross-reference between different Habitat Classes/Types and IHS Habitats.
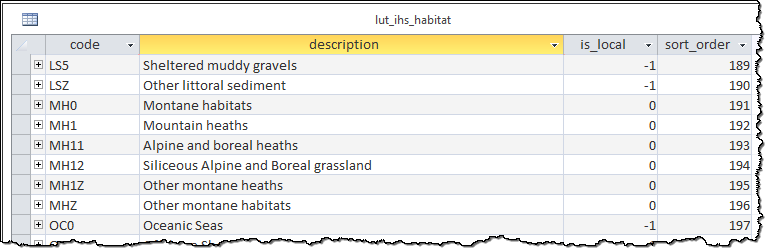
IHS Habitats can be flagged as local in the ‘lut_ihs_habitat` table. The format of the table is shown in the figure Format of the lut_ihs_habitat table (some columns have been hidden).
Only IHS Habitats flagged as local will appear in the ‘IHS Habitat’ drop-down list in the main window. This enables habitats that are not found in the local area to be hidden to avoid being selected in error (e.g. coastal habitats in land-locked counties.)
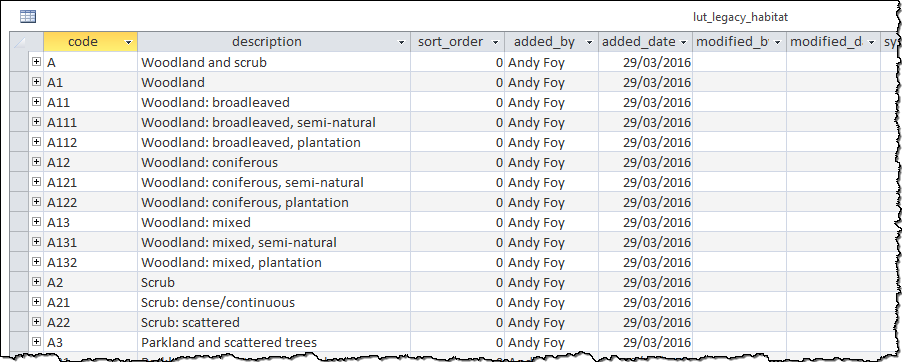
Legacy habitats can be configured in the ‘lut_legacy_habitat` table. The format of the table is shown in the figure Format of the lut_legacy_habitat table.
Existing legacy habitat records cannot be removed from the ‘lut_legacy_habitat’ table if they are referenced by any of the data records (i.e. if they have been used in any incid data records). This is because data integrity must be retained.
The OS MasterMap to IHS cross-reference can be configured in the ‘lut_osmm_ihs_xref` table. The format of the table is shown in the figure Format of the lut_osmm_ihs_xref table.
Existing OS MasterMap to IHS cross-reference records cannot be removed from the ‘lut_osmm_ihs_xref’ table (as they will be referenced by one or more of the data records (i.e. if they will have been used in the incid_osmm_updates table). This is because data integrity must be retained.
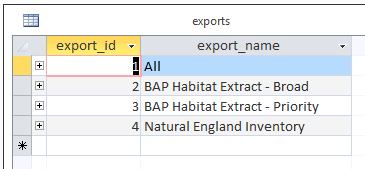
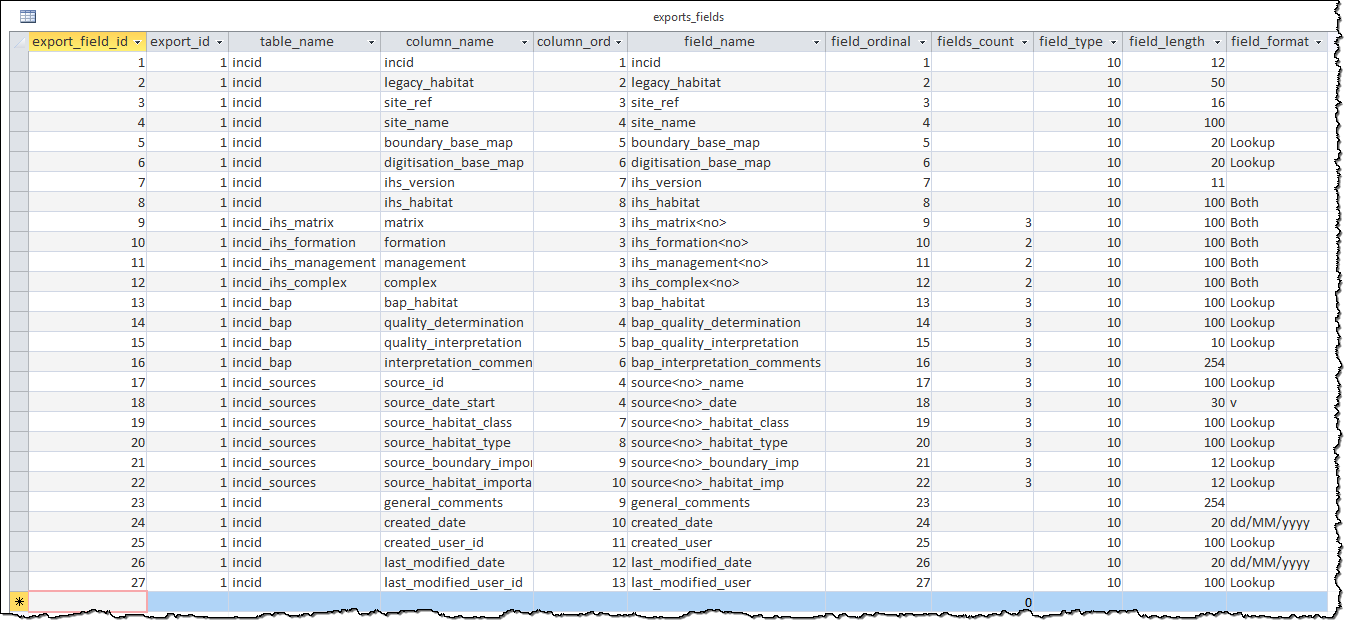
The ‘exports_fields’ table shown in the figure Format of the exports_fields table defines which fields are exported for each export type in the ‘exports’ table.
GIS controlled fields such as obj, shape, perimeter, area, x, y, etc. should not be included. These fields will be automatically added to the exported layer.
The format of some export fields can be modified in the output file.
Lookup related fields
The format of all fields that relate to a lookup ‘lut_’ table record can be modified using the following formats:
Valid Export Field Formats for fields with related lookup tables
Field Format
Description
Example
Code (or blank)
Outputs only the raw ‘code’ value of the specified field.
‘GA0’.
Lookup
Outputs only the ‘description’ field value from the relevant lookup table.
‘Acid Grassland’.
Both
Outputs both the ‘code’ and ‘description’ values separated by ‘ : ‘.
‘GA0 : Acid Grassland’.
Note
The above ‘field_format’ values (i.e. ‘Code,’ ‘Lookup’ and ‘Both’) are case sensitive.
The ‘field_type’ must be ‘10’ (text) for the specified field.
The ‘field_length’ must be long enough to contain the specified output format (up to 254 chars) or it will be truncated.
Source date fields
The format of the ‘source_date_start’ and ‘source_date_end’ fields in the ‘incid_sources’ table can be modified using the following field formats:
Valid Export Field Formats for source date fields
Field Format
Output Description
Example
blank
Start or End date in the format entered.
‘Jul 2008’ or ‘Nov 2009’
‘v’
Both Start and End dates in the format entered.
‘Jul 2008 - Nov 2009’.
‘dd/MM/yyyy’
Start or End date as ‘day/month/year’.
‘01/07/2008’ or ‘01/11/2009’.
‘mmm yyyy’
Start or End date as ‘month year’.
‘Jul 2008’ or ‘Nov 2009’.
‘yyyy’
Start or End date as ‘year’ only.
‘2008’ or ‘2009’.
‘D’
Start or End date in the vague ‘day’ format.
‘01/07/2008’ or ‘01/11/2009’.
‘O’
Start or End date in the vague ‘month year’ format.
‘Jul 2008’ or ‘Nov 2009’.
‘Y’
Start or End date in the vague ‘year’ format.
‘2008’ or ‘2009’.
‘P’
Start or End date in the vague ‘season year’ format.
‘Summer 2008’ or ‘Autumn 2009’.
Note
The above ‘field_format’ values are case sensitive.
The ‘field format’ value ‘v’ can be used with wither the ‘source_date_start’ or ‘source_date_end’ fields.
The ‘field_type’ must be ‘10’ (text) for the specified field.
The ‘field_length’ must be long enough to contain the specified output format (up to 254 chars) or it will be truncated.
Caution
When using the field format ‘dd/MM/yyyy’ the month portion ‘MM’ must be in capitals (lower case ‘mm’ means ‘minutes’ not ‘Months’).
Because of the way Source dates are stored in the database, dates entered as a single date (e.g. ‘01/07/2008’ or ‘2008’) rather than a date range (e.g. ‘01/07/2008 - 30/11/2009’ or ‘- 2008’) will always have a ‘source_date_end’ of ‘Unknown’ or blank (depending on the chosen output format).
Vague dates (e.g. ‘Jul 2008’ or ‘2008’) are stored based on the first day of the relevant period, so if output in a more precise format (e.g. entered as ‘2008’ but output as ‘mmm yyyy’) the day and/or month output will be the first day/month of the relevant period.
Date field specifiers
The following table describes the valid date and time format specifiers.
to browse to an existing database. If user names and passwords are defined for the database, untick Blank password and enter your user name and password.